Green Building Standards are also listed in your International Residential Code as well as other locations like the Department of Energy.
In this example I will be presenting what a homeowner builder should be looking for and how to determine if their sub-contractors are building an actual thermal envelope home or something made up from the old days regarding Insulation, Habitable Attics, I-joists and R-Factors.
IRC 2015/2021 definitions:
- BUILDING THERMAL ENVELOPE. The basement walls, exterior walls, floors, ceilings, roofs and any other building element assemblies that enclose conditioned space or provide a boundary between conditioned space and exempt or unconditioned space.
- CONDITIONED SPACE. An area, room or space that is enclosed within the building thermal envelope and that is directly heated or cooled or indirectly heated or cooled. Spaces are indirectly heated or cooled where they communicate through openings with conditioned spaces, where they are separated from conditioned spaces by uninsulated walls, floors or ceilings, or where they contain uninsulated ducts, piping or other sources of heating or cooling.
If you have visited energy.gov you have most likely read all about the "Seal and Insulate" program. You know what your "Climate Zone" is and you completely understand the thermal resistance to conductive heat flow (R-Factor).
In my example I'll be using our single family home with storage attic which may transform as we learn code requirements.
ICC Resources:
- International Residential Code 2015 and 2021 (IRC 2015, IRC 2021)
Energy.Gov Resources:
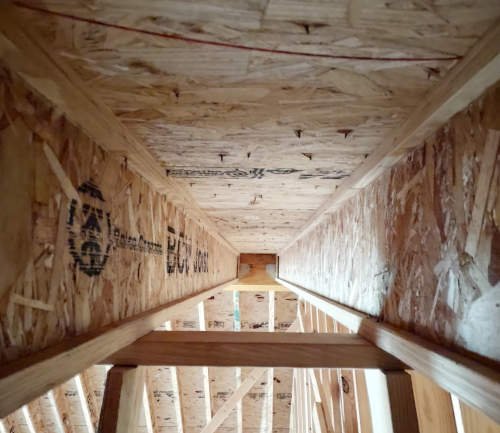
Design summary: The home is elevated above a full concrete pad built on pier and beam to joist system. The first floor walls are 9' with 16" ceiling joists that act as floor joists for the storage attic. The storage attic has a full size permanent staircase. The attic is for storage but by design code labels it as an habitable attic which required escape windows to be installed at the opposite end of the fixed staircase. The storage attic has 2 pony walls that support the 32' rafters of which 10' is over front and rear porches. The building envelope is external wall to external pony wall to rafters which are sealed 6" to the exterior of the home from the top plate rafter supporting wall. This provides insulation overlap to the exterior walls. The roof is unvented over the attic space while the porches have soffit vents only at this time. The sealed roof from wall to ceiling will have unfaced 12" maximum thickness up against the bottom of the roof decking. No vapor barrier or radiant barrier, or air channel will be installed. This is a unvented storage attic that is focused on thermal resistance and moisture reduction.
Thermal envelope design: To achieve the perfect thermal envelope we have to focus on reducing exterior air intrusion and reduction of moisture in the attic areas. To start, the elevated subfloors will be insulated with R-21 fiberglass insulation and have no air channels between the insulation and the underside of the subfloor. Note, we used AdvanTech 1 1/8" subfloor and have in places between 1/8" and 1/4" gaps. No gaps less than 1/4" with this subfloor should cause any air leaks if you use the recommended glue and installation methods. If you do have some gaps, don't fill them but seal them from bottom up or with a flooring underlayment from top down. By design, the AdvanTech should have no visible pass through air gaps. In any case, you should reduce any air leaks from your elevated flooring platform. Most larger gaps are over support I-joists and are glued to the joist. I am planning to use a non-expanding caulk from the bottom to seal any open to the air gaps. The first floor walls starting from the sole / bottom plate should have the inside joint between the 2x and the subfloor sealed. The gaps between the exterior sheathing and the sole / bottom plate should be sealed. If your sheathing is structural in design and you see spacing of a 1/4" or more consider a construction glue forced into the gap then seal with foam. Seal each exterior sheathing expansion gap but do not fill the gap, use a foam or a good tape. Remember, you are sealing not insulating at this time. You do not need to seal between the exterior sheathing and each stud. If you have improperly nailed sheathing this is the time to use construction glue to add additional connection strength. The walls top plate connection to the exterior sheathing needs to be sealed as well. The top plate may actually be a edge junction it's a good idea to caulk flush any gaps in your 2x double top plates. If you have a single top plate then continue. Continue exterior wall sealing as you did your first floor, in the attic, seal from the top of the top plate to the exterior sheathing. If your exterior sheathing ends at this point look for the top edge connection to the exterior side of the top plate. Seal the seam between the top plate and the exterior sheathing. From here, depending on your wall design you should either be reaching a pony wall or a roof rafter. Form this point it's important to understand that you must insulate slightly outside of the wall envelope. You are going to need to overlap your top plate with insulation that is placed between your rafters. Our design has a 6" overlap of the exterior because the roof rafter continues out over the porches. In most cases this will be your eaves which you should insulate 6" out into your eaves over the top of your top plate. With the overlap you are not longer required to use R49 to R60 in climate zone 2. You can insulate to R-30 if you don't have the rafter depth like a 2x8" or 2x10". In our design we have BCI-6000s 11 7/8" rafters so a R-30 would fit but also two layers of R-21 would fit giving us R-42 total. We are not attaching any ceiling components to the rafters so we may actually run the R-21 then R-30 on top filling in the gaps using insulation stays and insulation netting. The goal is to build the thermal barrier to reduce heat loss during the winter. We also know that roof moisture levels increase in the winter so by using more insulation in the rafters as a thermal break we are attempting to cycle the air to reduce moisture in the air before it reaches the underside of the roof decking. Insulation will allow moisture to pass, we really don't need to channel the moisture up to the peak in fiberglass insulation, it will eventually make it to the ridge. But we need to keep some air moving to dry things out so most of the condensing happens in our HVAC air handler.
editing: